Thursday, June 20, 2013

For my Bestie- Lindsay.

Okay.. So here goes.. I haven't been blogging in awhile. Started off real enthusiastic about it, but then the projects I was blogging about started taking over my life. Its a great way to find yourself, and I did. I discovered that I am creative, and artistic. But I guess in a way it was covering up bigger issues. The issue with the relationship I was in- avoiding the boyfriend who was not meant to be mine- avoiding the lack of motivation for other things. Things like my weight, and my health. I was avoiding those too.
 
Yesterday: My bestie starts a blog. Let me side track for a minute: This girl, let me tell you, is one of the most amazing people I have EVER met. Period. She is caring, and loving, and patient. Very tolerant (I guess she would need to be with a friend like me lol) She is strong, and brave, she has always taken care of me. She is my nurse when I'm sick, she is the shoulder I cry on. This girl knows absolutely everything about me. She is my family.
 
Okay, Blog. She starts a blog about her struggle with her weight, and her sudden will power to save herself. Remember me saying she was brave? This is why: what woman wants to put their weight up on a public blog for other to view and judge? she did. It takes a special kind of person to be that vulnerable. Well let me tell you what, since my Bestie, Lindsay, is so brave, why the hell not be brave myself?!? This is the reason I decided to start writing again. To tell everyone, and make a promise to myself, that I will be brave as well. I have set my mind to the changes I want to happen, and so they will be done.
 
This is me, after walking outside in the 80+ degree heat. 30 minutes. Uphill for 15. I'm probably gonna die. lol It actually wasn't too bad. I feel good, accomplished.
 
 
 This is me at 221 pounds. That is only 1 pound less then January, and 4 pounds less then last year when I weighted before that. One of my issues, is that I've been dieting. I've been consuming 99% more fruits and vegetables then I've ever eaten in my life- ever. Cut back on my calories- way back- and nothing. I decided because of my besties blog, and her strength, that I will try harder. Mix it up- exercise. And probably most important, see my doctor. Make sure there is nothing stopping me from achieving my goals.
 
 
I have decided to at least try and quit smoking- to obviously save money- and to clear my lungs of all that crap. To wake up 30 minutes early every morning (that's 5am people!) and walk for 30 minutes- at least 5 times a week. To do squats and jumping jacks on my day off (who needs a gym) To be healthy. That's what I want to be. Honestly, I could care less about the number, I actually like the way I look. But I feel like its making me sluggish, and one thing I cant stand is lazy.
 
So this is me. Taking my best friends motivation and running with it. Hopefully soon, we will be two hot, skinny, healthy bitches, lounging on the beach.
 
I love you Lindsay, and Thank you for being so amazing.


Wednesday, April 24, 2013

My jewelry kick..

I've been making a lot of jewelry lately.. Even selling some of it. I decided I could never find anything I really liked at the stores, and if i did, i didnt want to pay 30 bucks for something that I could make for cheaper. So i decided to teach myself. Its strange when I pick up a new craft I start getting these images in my head of what I'm going to make, and how to make it. Some turn out better then others, of course, but I love them all. A friend of mine told me that we should make a catalog, leave it at work and other places to see if I could start selling my stuff, I thought it was a great idea, so I have been taking picture of them as I go. Although I really just started doing it for me, it has become a great passion of mine.


They look so much better then the pictures. I am planning on getting professional pictures done- then I will post those too.. I am making them in all different colors. I have many necklaces also. Its very relaxing for me, if you are stressed, try it. Get creative. Make something you love and others will too! I will post these on my Etsy page in a few days and share the link :o)
 

Saturday, July 21, 2012

Refinished Furniture


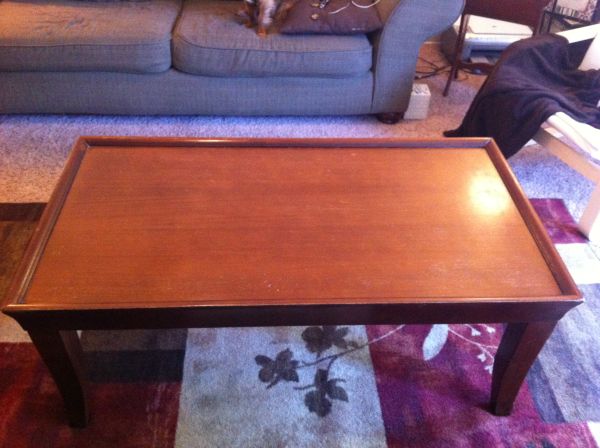
I bought this table on craigslist for $40- from some absolutely wonderful people! I sanded it down, all by hand, stained it and finished it. Its amazing and I love it. What a great piece of furniture... I also decided to do the same thing with the kitcken table thats been with my family for 10+ years that was kinda beat up. This way, even though they are different shapes and styles, they are still a matching set. I'm brilliant and I love it :o)

Friday, June 15, 2012

Fancy Dish Soap

Let me just start out by saying, this didnt come out the way I wanted it to. Nevertheless, I love it. It looks soooo amazing in my kitchen. And it works very well. No more ugly dish soap container for me. I absolutely love it. And it cost me 3.99 for the the glass bottle. I just etched Dish Soap on the side of it, I think it looks wonderful, but the etching doesnt stand out as much as I would have liked. Either way Its beautiful. :o)

Tuesday, June 12, 2012

Pictures on Wood

This one was made for my mom, the dog on top died 7 years ago- Poppy, she was my dog growing up. The one underneath- Roshi- my mom got when Poppy died. Roshi passed about a week ago- I thought this would be a good way for my mom to hold on to their memories forever.
I made this for my best friend.. Recently this dog-Taz-went to heaven.. She loved this dog, as did I. He was part of the family. And his death was a tragidy, she is very torn up about it. The concept is easy, but it does take some time.

You need:
*A picture- Printed on paper- whatever size you would like
*Gel Medium (can be found in painting section of craft store) I used Basics
*Mod Podge
*Piece of wood- that matches size of the picture you printed out. (also found at craft store- in wood section)
*Sand paper- Fine

*First you print out picture- the ones on top were 5x7s- the one on the bottom was 8x10. Sand the area picture is to be applied- makes everything stick and hold better. You apply the gel medium to the front of the wood and make sure its totally covered. It doesnt have to be very thick- just needs to be covered.
*You lay the picture down- face down onto the gel. Make sure you press down firmly- getting all bubbles out.
*Wait.... You can leave it overnight- or let it dry at least 6 hours to make sure its totally dry.
*Get a wet cloth and soak the back of the picture- making it kinda transparent.
*Start to rub- gently rub off the paper- this takes some time, and some of the color will rub off- but it gives it a rustic look. I usually rub off the topmost layer and let dry a minute until it turns white again. Then apply cloth to small parts at a time- rubbing til you cant feel anymore paper left. Once all the paper residue is gone, let dry again for about 5-10 minutes.
*Apply Mod Podge across the top of the picture. let dry about 10 minutes and add another layer.

I stained the wood around the bigger one since it was a thick wood block- if you do decide to stain the wood surrounding do it while the picture is still covered in paper- if any stain gets on it will come right off with paper. Make sure you apply Mod Podge to stained areas also to get that shine.

 Thats it! You can hang these with ribbon to hang on the wall, or you can put them on little canvas stands. anything goes- the wood is usually thick enough that you can add nails or little hanging clips.

Sunday, June 10, 2012

Lemon-Lime Soap

4 ingredients! No artifical colors or fragrances!! I was talking to my mom about the other soap creations i've made, and how I come up with these ideas. And it hit me, I can use all kinds of everyday stuff to put in these bars to make them amazing and really good for your skin. So I decided lemon & lime zest. I melted down the Shea Butter base- zested 2 limes and 2 small lemons- added in a spoonful of coconut oil, and Voila! they are perfect. They smell amazing. Will make your skin really soft and moisterized, and they are all natural! I didnt have to add any fragrances or colors at all. Love it! I'm excited to give them away :o)

Thursday, June 7, 2012

More Cake Pops!


More, more, more....  I made these for a friend of mine for her Bday today. Her fave color is green. Just thought of this new way to display them and wanted to try it out. I think it looks pretty good!

Wednesday, June 6, 2012

Alcohol Inked Vase


Alcohol Inked vase.. I got the Idea from the projects list on Michaels.com.. I decided a few days ago that I was tired of having my straws in a drawer and difficult to grab, I saw this and thought its the perfect solution. A piece of art to hold them in. A sophisticated way to contain my childish love of straws.  

You need:

A vase
Alcohol Ink (usually found in scrapbooking section)
Alcohol blending solution
Paper Plate
Paper towels
Spray bottle (optional)

Make sure you wash the vase first and remove any stickers. Place it ontop of paper plate to catch the mess. If you get any on your counter- the blending solution will get rid of it, just pour a few drops on and let sit for about 30 seconds and wipe off with towel.

Open up the ink and start dripping it down the side, any way you want. Its your art. Go all the way around until covered. Let sit for about 5 minutes.

With the blending solution, your going to either put it in a spray bottle, or just squirt it down the side in certain places to blend the colors where you would like them blended.

Once done, let it sit for about 30 minutes. You can either bake the vase @350 for about 5-10 minutes. Or you can spray with Varnish. The varnish will need about 24-48 to completely dry. Make sure you dont use too much- as it will get heavy and pull down color.

Voila! You can use your vase for anything, I chose straws because I wanted a place to put them that would look nice in my kitchen. Good Luck!


Tuesday, June 5, 2012

Hand made Gifts

One of my favorites. Made this for my mom for Christmas. They asked for stuff for the house for Christmas gifts. I figured she needs decorations because the house is pretty plain. And I usually make her something craft every year. So I decided a new center piece for the table they just bought would be perfect.
I bought a pine serving tray from Micheals for a few bucks. Painted it black and applied clear topcoat. Bought a vase and a couple small candle holders for cheap. Bought the stems and the "water" there too. It was a very quick project. I even painted some of the river rocks with meaningful words. She loved it.

Sunday, June 3, 2012

Homemade Gift Basket

I finished it! Took it to my Bestie today, she loved it. I bought the basket at Micheals for like 5 bucks. The jars were a total of 5 bucks also. I painted us both a picture so that we will alway have matching pictures. We have tons of matching stuff. Anyway, the basket includes:

Coconut-Rose Sugar scrub
Cranberry-Almond Granola
Coconut-Oatmeal shea butter soap
Apricot-Grapefruit shea butter soap
Hibuscus Painting

I also included a little note telling her what everything was. It said how much I love her and that I'm going to miss her when she moves..

Creating Memories is priceless with those you love.

Saturday, June 2, 2012

At home fun!

My Babe and I made Gak! lol or something like it. Saw this on Pinterest and thought it was pretty cool. My boyfriend got super excited and wanted to try it, so we did. Its super easy and fun to make- great for the kids! I used mine to clean my keyboard just now and it worked like a charm! :o)

You need:

Borax Laundry Booster
Elmers Glue
Water
Food coloring
Plastic cups (you can use bowls or glasses too- very easy to clean)

So you mix some borax in container that has a lid so you can shake it. Use 2 parts Borax to 1 part water. You really only need about a 1/2 cup total. Set aside.

You fill a cup about 1/3 of the way with Elmers, then another 1/3 water. mix well, getting any excess glue off the sides of the cup. Put in food coloring of your choice. Mix well.

You will then pour in Borax solution just a little at a time. Continue to mix. Repeat until it is all mixed together and just one large glob. I used a butter knife to mix mine, it cleaned off in seconds.

Bounce it. Shape it. Throw it. Enjoy!

Coconut-Oatmeal Soap

Here is the coconut-oatmeal soap I made today. Its so pretty and smells amazing! I love it! I'm excited to get my gift basket all put together. My bestie is going to LOVE it :o) Its so easy to make, I bought all the stuff I needed at Hobby Lobby. I bought Shea Butter soap in bulk. Melted it down as instructed. Added my color and scent, then poured into my mold. I just used a Pyrex dish, but they sell molds at the store. I think its more unique this way. I put the oatmeal at the bottom of the dish first, then poured in the soap mixture. Let sit for about 20-30 mins and cut out. Its really easy to do, and there are so many combinations that can be done.

Friday, June 1, 2012

California Club Rolls


California Pizza Kitchen has this amazing appetizer called California Club Egg Rolls. They are so good that I usually order them as my meal. Anyway, I decided to try and make them, without a recipe... I just got finished eating them and they were just as good an not very hard at all to make.


You need:

3 Pre-cooked grilled chicken breasts
2 Avocados
1 Roma Tomato
6 Strips of bacon- cooked
1/3 A block of Monterey Jack cheese
10 Egg Roll wraps
Salt & Pepper
Garlic powder


Your going to dice the tomatoes, cut chicken into strips, half avocado and cut lengthwise. After cooking bacon, you want to dice it. We want the cheese cut into strips also. Place ingredients in in a pile. Add salt, pepper and garlic to taste. Wrap like you would normal for egg rolls. Fry in pan until golden on each side.

Service with Ranch, or Chipotle garlic ranch. Enjoy.

Thursday, May 31, 2012

Apricot- Grapefruit Homemade soap

I have successfully made soap! Very excited about it. For this batch I used shea butter base, and made it an exfolicating apricot-grapefruit blend. Smells amazing and is going to help with my super dry skin. I'm making another batch that will be coconut-oatmeal. Bet its going to smell fabulous! The plan is to make batches- along with some sugar scrub, & homemade granola for an awesome gift basket. We'll see how it turns out!

Monday, May 28, 2012

Raindow Soda Cake!


Rainbow soda cake w/ whipped pudding frosting! This cake is so fluffy, its amazing.. Not only that its super fun to make and to eat! Its so colorful, it makes me happy. Brings out the kid in me. My babe actually helped me make it. It made him very happy too :o)


1 box White cake mix
Small package instant vanilla pudding
1 container Cool Whip
1 1/2 teaspoons Almond Extract
1 1/2 teaspoons Cherry Extract
Food coloring
1 1/4 cup Sprite
3 egg whites
1/3 cup veggie oil
2 cups Milk

You should follow the directions on the cake mix box. Oil, egg whites & instead of water we're using Sprite. Mix together as instructed, add about 1 1/2 teaspoons cherry extract. Separate into multiple bowls, however many colors you want to use.

Each bowl add your food coloring. Color to your liking.

Grease and flour your cake pans. Cake mix says just grease, but mine got stuck. So we're gonna flour it.

Poor the colored batter in one at a time, however you want. Some of each color in both pans in different orders. Or some colors in one and some in the other.

Bake @ 350 for about 33 minutes. Toothpick test. Cool completely.

In large bowl, pour in pudding mix and 2 cups milk. Place in fridge and set for 5 minutes.

Once firm, fold in thawed Cool Whip. Add Almond extract and food coloring. place back in fridge until cake is cool.

Frost stacked cake like normal. Place back in fridge and set for a few hours before serving. Enjoy.


Thursday, May 24, 2012

Homemade Granola

I tried the granola recipe today that I found online. It called for dried cherries and instead I used crasians, and almond extract along with the vanilla. Its pretty good, Might have cooked it too long though.. maybe only 15 mins next time. The reason I tried this recipe is because Whole Foods has some Awesome cherry granola, but its $3.50 per lb. It goes really quick. Thought it would be cheaper to just start making my own.. anyway, heres the recipe!

Ingredients:Vegetable cooking spray
4 cups old-fashioned oats (rolled)
1/2 cup coarsely chopped almonds
1/2 cup coarsely chopped pecans
1/2 cup coarsely chopped dried morello cherries
1/2 cup sweetened coconut flakes
1/2 teaspoon ground cinnamon
pinch of salt
1/3 cup vegetable oil
1/4 cup honey
1/2 cup light brown sugar
1 teaspoon pure vanilla extract


Preparation:
Preheat oven to 350 degrees.  Lightly coat a baking sheet with vegetable spray.  Combine oats, pecans, almonds, cherries, cinnamon, coconut flakes and salt in a bowl.  Set aside.

In a small saucepan over medium heat, add vegetable oil, honey, brown sugar.  Stirring occasionally, bring to a boil and remove from heat.

Add the vanilla and stir until incorporated.  Pour sugar mixture into the oats, using a wooden spoon, stir until all oats have a glossy coat.

Pour granola onto prepared baking sheet and spread evenly.  Bake, stirring occasionally, until it reaches a nice golden brown color (20-30 minutes.)  Let granola cool completely and break into chunks.  Store in an airtight container

Wednesday, May 23, 2012

Seashells and Sand

So I bought this cute little Apothecary jar from Hobby Lobby for 6 bucks. Sand for 2.50 and thats it. I thought it would be a cute way to display the seashells my babe and I found on our first vacay together. Very simple, but super cute!

Sunday, May 20, 2012

Albuquerque Skies


Albuquerque skies... What a beautiful sunset.. They happen all the time here, almost every night.. I've never seen a sunset as beautiful anywhere else. Makes me glad I live here. Also, we just watched the Eclipse. It was amazing- being out in the open, where there is nothing to block your view is amazing. Glad I got to enjoy it with my baby.  These pictures insire me to paint.. But how to capture something so beautiful? I'll work on it. Keep you updated when finished! Off to Michael's for some canvas and paint! :o)

Thursday, May 17, 2012

Our Fish


The top one is Dude, The lower is Bro. lol They are our betta fish. Dude is a crowntail betta, his fins are amazing. He is in a vase with a Peach Lilly at the top. Bro is in a huge glass bowl. He is a half moon betta- when his fins and tail are straight out, they make a half circle. We etched both of their names on their bowls too, that was my boyfriends idea- How cute!

Hibiscus Painting

Hibiscus Flower paintings I made for my bestie and I. This flower is our fave, so I decided to make us each one. Done with Oil paints. My bestie is amazing and I'm gonna miss her! She is moving to Mexico in August of this year. Its gonna be tough, but we share alot- even matching Tattoos!!